Left Continue shopping
Your Order

You have no items in your cart

You might like
From $1299
Show options
From $2799
Show options

To Taper or Not to Taper? (pt. 2)

Last week, we talked about the recommended methods for sizing up while your piercings are below 00 (10mm). If you’re under 00, click here to read our recommendations for safe and healthy tapering.

This week we’ll be helping out those of you who have moved on to bigger sizes and are unsure of the best/easiest/safest way to go about it. While tapering is a great option for smaller sizes, it’s actually not the preferred method beyond 10mm as the jumps between sizes will grow higher and higher.


So, just what is the recommended method? Taping!


What you’ll need


Obviously, you’re going to need tape. In our experience, the absolute best tape you can use is Bondage Tape, which is actually designed for safe contact with human skin. (Plumber’s tape will also work for stretching, though the preferred method is still Bondage Tape. Just make sure that you do not use electrical tape.)

 Bondage Tape.


You’ll also want to get plugs in your next size up. We recommend using Single-Flare Steel Tunnels for two reasons. One, steel is the most sanitary material for stretching. And two, the non-flared backs of the tunnels will make it much easier to fit them in your ears without danger to your lobes. It’s also a good idea to get your hands on some Ear Butter for this transition to take good care of your skin, prevent scar tissue, and keep things nice and sanitary.


A pair of single-flared steel tunnels.


What to do:


Remove your current plugs and wrap the wearable area with the tape. Start by using a single layer and see how that fits in your ear, and if it goes in super easily, feel free to add another layer or two. The idea is for it to stretch your ears a little bit, but not too much. Because you’ll only be stretching in tiny increments, you can add more tape every day or two. Just make sure to take it slow and listen to what your body is telling you. Everyone’s ears are different!


Ear butter: Nectar of the gods.


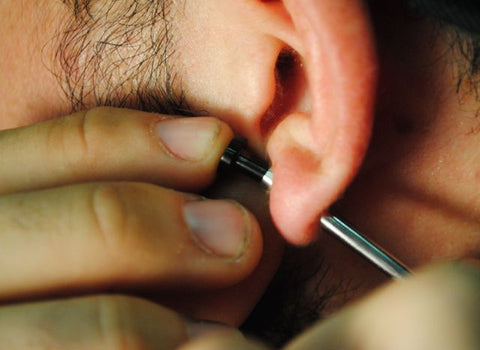
Once you’ve managed to get your plugs to the next size up, it’s time to put in your new tunnels! Remove your taped-up plugs, and make sure your ears are nice and clean. Add some Ear Butter to your lobes to ease the transition, and insert your (sterilized) Single Flare Steel Tunnels by slipping the non-flared ends through your lobes.


Remember:

Tearing, infections, scar tissue, and blowouts are not worth it and easily avoidable! Keep it clean and take it slow! If you cause yourself to tear or bleed, go back down to your previous size and let things heal up before moving up! We always recommend 6 weeks for full healing between sizes. Believe us, having healthy and good-looking lobes is totally worth the wait!

Only YOU can prevent blowouts!

Read more

To Taper or Not To Taper? (pt. 1)

 To taper, or not to taper? That is the question!


No matter how long you’ve been stretching your lobes, you’ve probably at some point considered using tapers (the long, cone-shaped things designed to ease the jump between gauges).


For those of us wondering whether or not to use tapers, let’s start by asking one simple question: What size are you currently at? If you are under 00 (10mm) then yes we definitely recommend using tapers. If you’re currently 00 or over, we’ll have you guys covered with next week’s blog.


So for you folks in the proper size range (which again is under 10mm) here is the recommended use for stretching tapers. Take your pick from each of our two recommended methods of tapering:


  1. Slow and Steady

The slow and steady method is exactly what it sounds like: slowly pushing the tapers through your lobes little bits at a time and wearing them around in your ears as you gradually move up to the next size. If you go this route, you can either use acrylic tapers (see pics above), which are cheaper but harder to sterilize and more difficult to move through your skin – or steel tapers (recommended) which are a little more expensive, but cleaner and move through your skin more easily. Go as slow as you like, but just make sure to use heavy amounts of moisturizer/lubrication to keep your lobes healthy and to prevent tearing.


  1. Fast and Clean

Want to just get it over with? Get a good quality (and sterile) pair of steel tapers for gauging ears that have concave ends (see pics above). These hollow ends will leave room for you to place your next size plugs so that they’ll slip directly into your lobes with the taper. Again, you will need to use, heavy amounts of lubricant as you guide the taper through your ear until your new plugs are in place. A great place to stretch is in a nice, hot shower.


Final Thoughts


Everybody has that friend who is impatient and jumps sizes, or sizes up too fast. Do not be that guy. Trust us on this one. Wait a minimum of six weeks between stretchings. That way, your ears will have time to heal and you won’t get scar tissue. If you bleed, go back down a size and let it heal completely before trying again. And never, ever skip sizes. If you want thick, healthy lobes with no blowouts or major scar tissue/permanent damage, take your time and use your head. You’ll look way better and save yourself a ton of pain.


Stay tuned for next week when we cover stretching to sizes above 00!

Read more

Why We Love Ear Butter (And You Should Too)

Alright, we get asked a lot about this one. “Ear Butter? What the hell is that? I don’t need it do I?” As a matter of fact, this little taste of heaven in a can just happens to be a PYH shop favorite when it comes to stretching, maintenance, or just wanting to smell like a boss. So what is it and what does it do for you? Let’s look at a couple of the ingredients.


Probably the single most important thing found in Ear Butter is Jojoba (Ho-Ho-Bah) Oil, which is the closest thing in nature to replicating your own natural body oil. Just like the oil in your skin, jojoba oil works to cleanse, moisturize, and soften dry, flaky, and rough ear lobes. Ear Butter blends this with vitamin E, coconut, and clove bud oil for a silk-smooth effect.


Beeswax works as the protectant in Ear Butter, letting your lobes breathe while still protecting them. Vegetable glycerin helps protect your skin from harmful UV rays while working to help heal any scar tissue you may have built up. Oh and one more thing, Ear Butter lubricates your ears for stretching, while simultaneously preventing microbial infections.


So yeah, that’s why we love our ear butter, and you will to. Your ears will thank you.
Read more